This is the multi-page printable view of this section. Click here to print.

Return to the regular view of this page.

Getting started

Congratulations, you’re the proud owner of a shiny new MCH badge! It’s a fully-functional computer, and while you (can do stuff with it) out of the box, the real fun starts when you start hacking it. The badge has two processors, an FPGA and a ton of sensors and toys to play with all in the palm of your hand! And we’ve done what we could to make using it as friendly and intuitive as possible. We had a lot of fun making it, and we hope you’ll have a lot of fun using it.

No fluff! I wanna get started!

Hook up the battery to the badge, the connector only allows it to be connected the right way around. Set the labeled on/off switch to ON. Things should quickly start up, display works and it makes a sound.

If this is the case everything works and you’re good to go. Attach the battery to the badge using the included velcro, slap on the lanyard (and possibly insert an SD-Card) and Start Hacking!

Don’t forget to update the OS and preinstalled apps. And have a look at some general tips for Using the Badge.

The rest of this page contains more detailed instructions in case you run into problems.

In the pack

Picture of contents of pack

If you are reading this at MCH, you received the unassembled badge in a bag when you entered the camp. Inside the bag are the following items:

(These will obviously change subject to what is in the pack)

  • The badge itself
  • A lithium-polymer battery for the badge
  • A self-adhesive Velcro patch for attaching the battery
  • A printed badge lanyard
  • A leaflet containing basic information about the badge

Fitting the battery

Battery

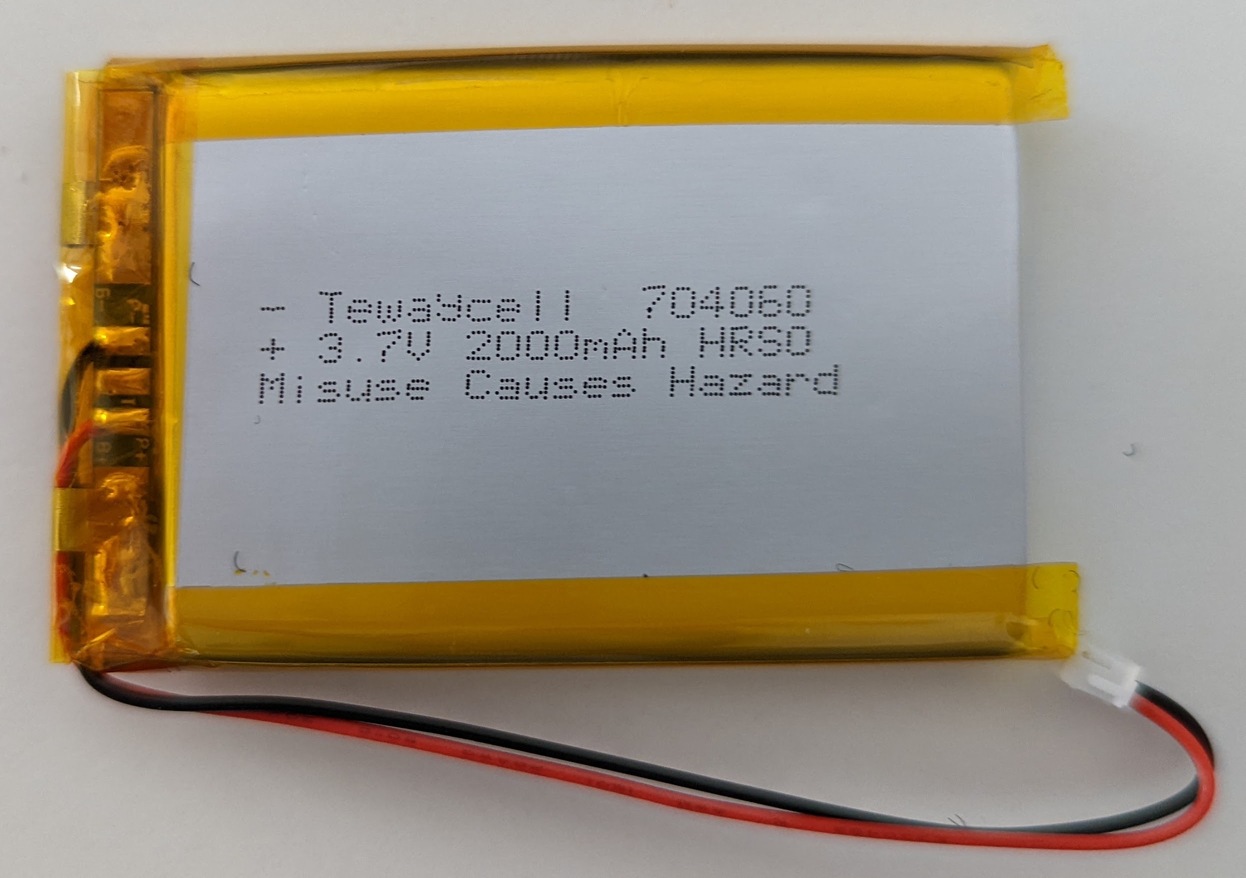
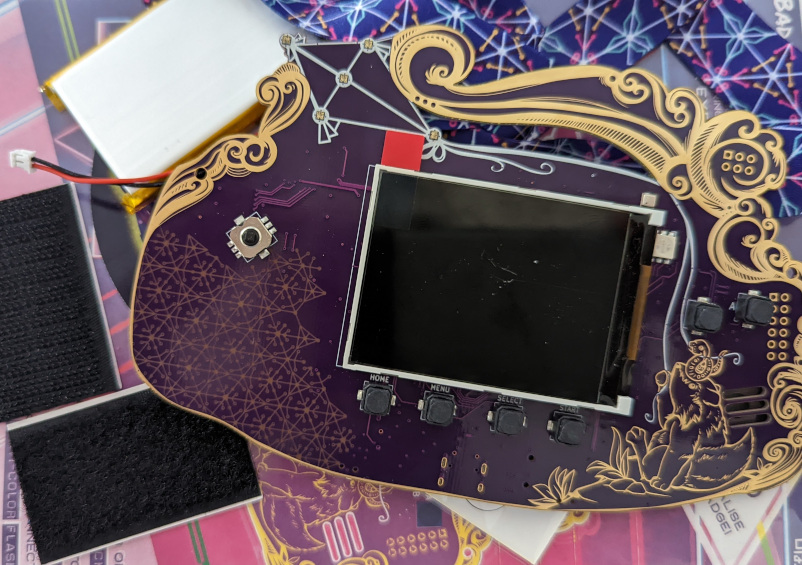
The battery is a silver pouch with a short cable terminated in a trailing socket connector. This mates with a PCB mounted plug which you’ll find on the component side of the badge. Place your badge screen side down with the USB-C connector facing towards you, and you’ll find the on-board battery connector at the bottom right next to a field of gold squares (the prototyping area -> link to hardware).

Connector

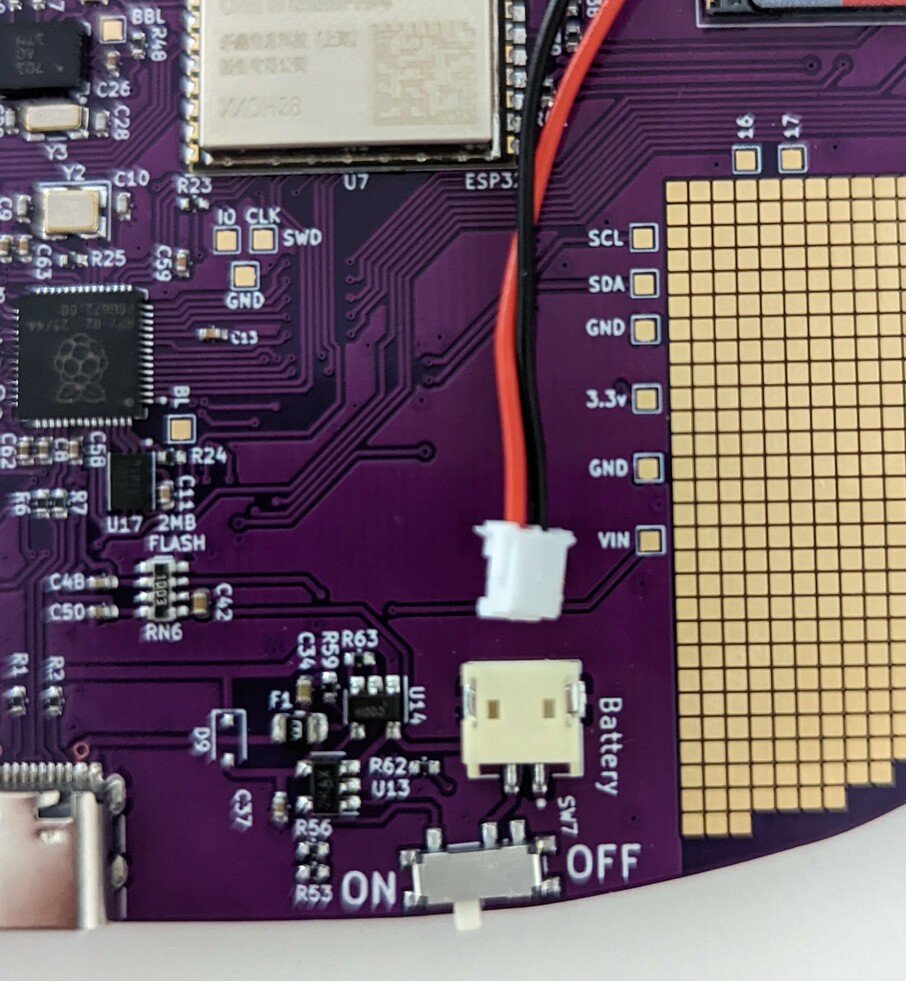
The trailing plug on the battery has a small lug on one side that interfaces with a notch in the on-board socket. With the lug facing upwards, carefully slot the two connectors together.

Now turn the badge on. The switch is labeled ON OFF and located just below the battery connector. It will boot up, the display will start displaying things and the speaker will make some noise.

The battery should now be attached to the badge via the connector. We’ve provided velcro so you can affix it to the badge more firmly. One side of the battery tends to buldge, so try out which side lies most snugly against the badge. Find a good spot on the back of the battery and the reverse of the badge to attach the velcro.

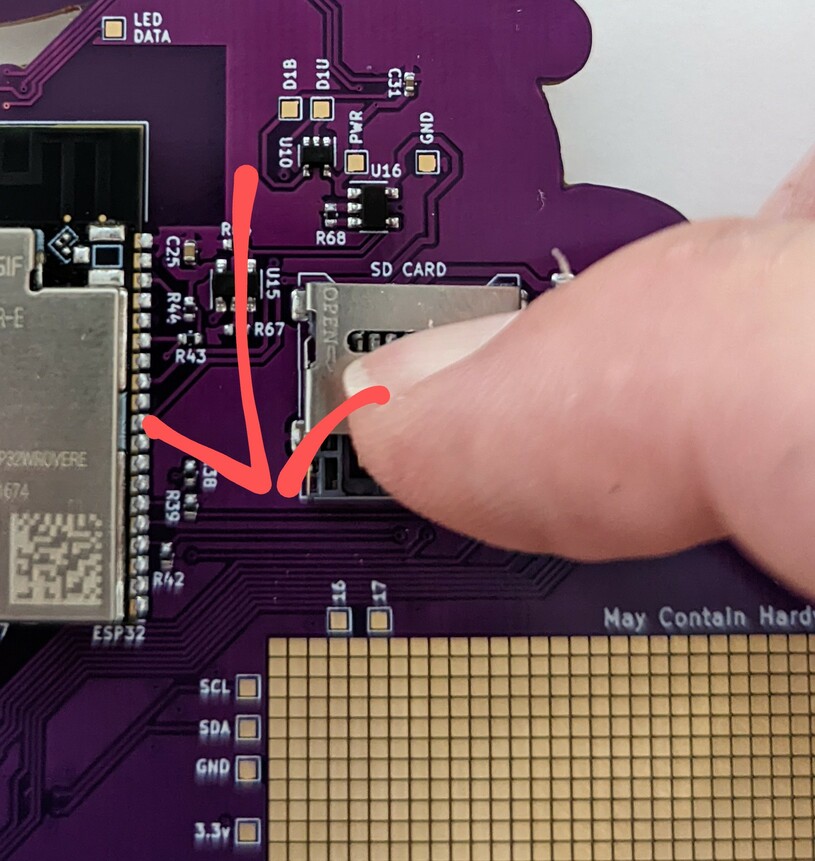
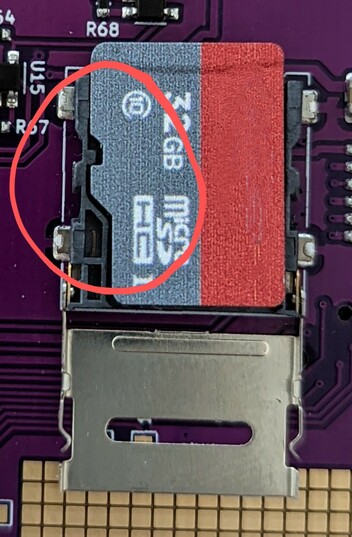
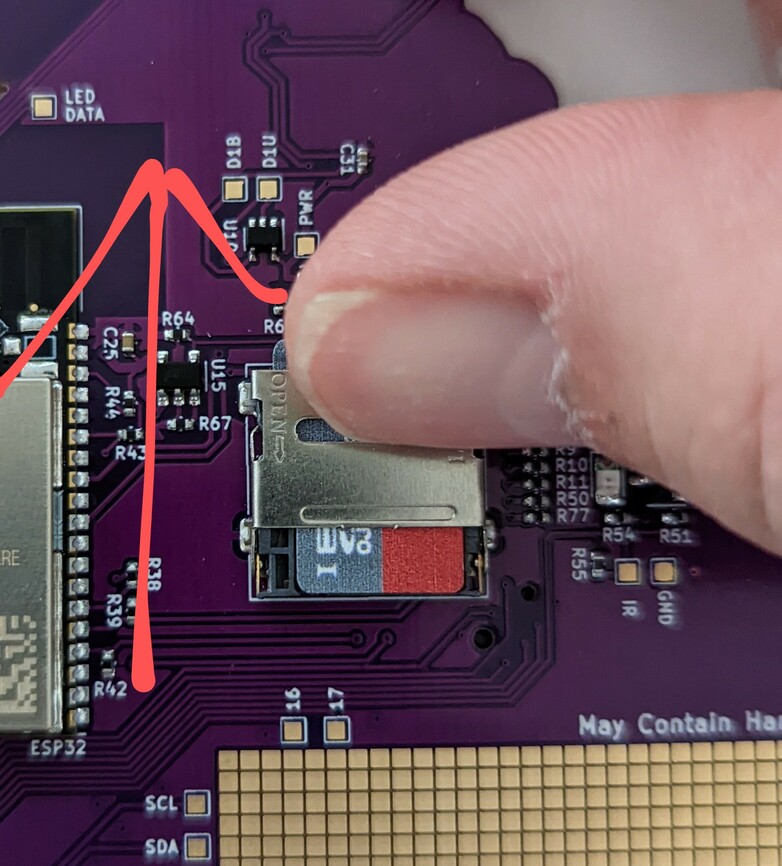
Inserting an SD-Card

The SD-Card holder is a bit fiddly. We’ve assembled an illustrated guide to inserting an SD-Card.

Now what?

You should now have a working badge. We strongly suggest that you hook it up to a live USB power source to fully charge the battery. You’ll need a cable with a USB-C at the Badge end.

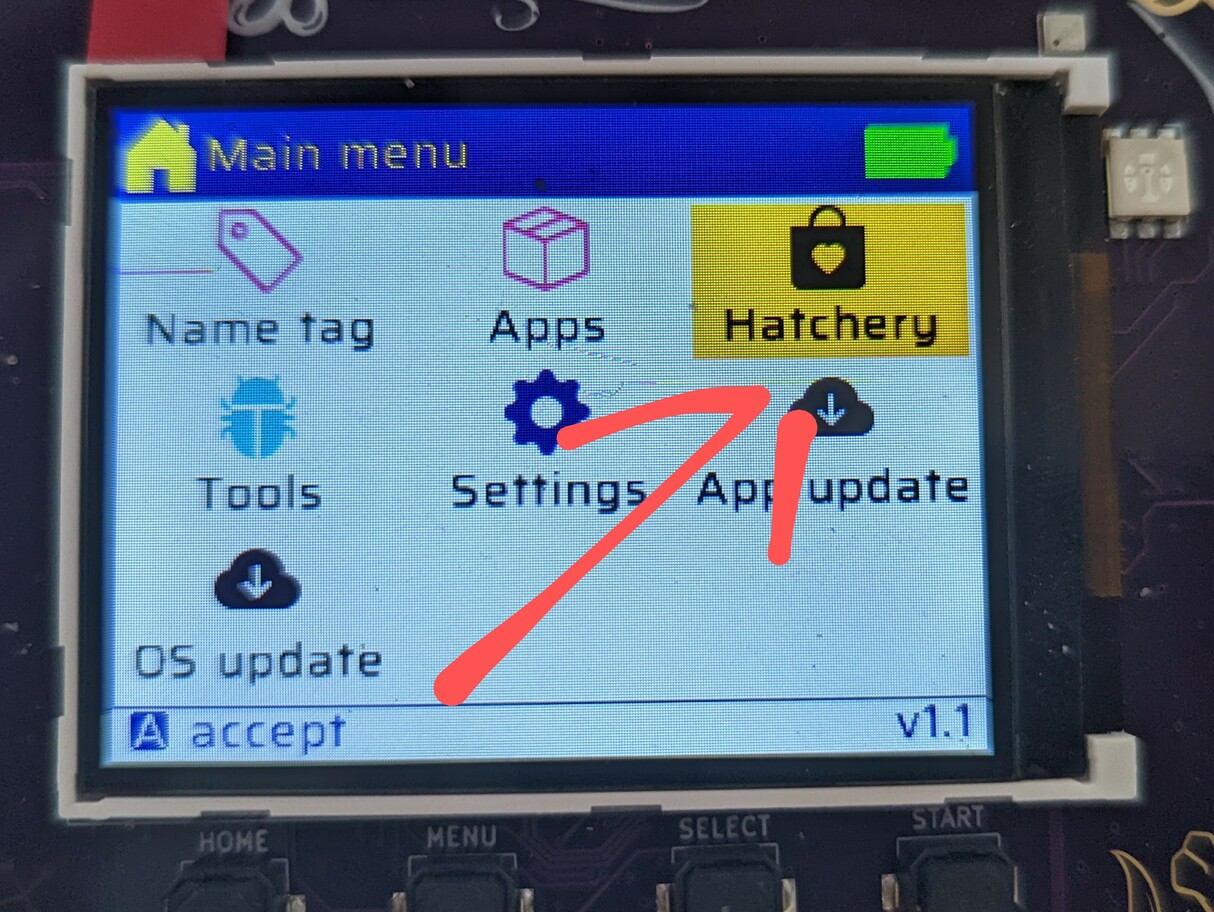
While the battery is charging, it’s time to explore the badge a little. When you turn it on it will start with a splash screen and details of all the sponsors who have made the event and the badge possible. You’ll then see the badge menu screen, so now’s a good time to move along to the next step in this introduction: using the MCH 2022 badge.

Also, as with all security critical devices, make sure you update the Badge software and any of the apps you installed. There’s a menu item for that, which will probably save you a lot of grief from bugs we’ve already fixed!

1 - Inserting an SD Card

I inserted the card correctly, but it doesn’t work.

Format the card as FAT32 not exFAT, please. And if you are using a humongous 12TB Super SD Card, maybe try a cheap, small one from the grocery store :)

Oh Noes! I broke off the little metal thingie of the SD Card holder!

Oh well, better luck next time! Don’t feel bad, you’re not alone.

You can probably stick it back into the little grey plastic thingie.

I almost broke off the little metal thingie of the SD Card holder, WTF!?

Lucky you! You’ve come to the right place.

The trick is to:

  • insert a fingernail into the SD-Cardholder manipulation slot and pull DOWN! (DOWN is in the direction of the arrow in the picture.)

  • Somehow I never realized the metal thingie actually has “OPEN->” embossed in it until I uploaded the picture for the documenation. Don’t I feel stupid …

pull DOWN

  • fiddle around with your SD-Card to somehow get the alignment slot of the grey plastic thingie to align with the alignment notch in the card.

align notch

  • find a small-fingered nerd to hold the SD-Card in place while you flip the metal fastener over the card and insert a fingernail into the SD-Cardholder manipulation slot and push UP! (UP is the direction of the arrow in the picture)

push up

2 - Installing Apps from "The Hatchery"

WTF is a Hatchery!?

The Hatchery is an app store for The Badge!

You can also sort through the apps other people have published there. If you do so, please be aware that we don’t check for malware and will NEVER ask for your credit card number or home banking password (just kidding, off course we will.)

BTW, it’s called Hatchery because it (used to) contain “eggs” because previously the Hatchery was limited to Micropython apps and those are called eggs. And eggs hatch if you don’t eat them. Nowadays the Hatchery also supports native ESP Apps and FPGA bitstreams.

You can also use the Hatchery to publish your own apps and share them with friends. And unlike other App Stores, you don’t need a Dunn & Bradstreet Number, $1000 and don’t have to worry about your app being rejected because it contains malware.

A Word of Warning

Our crack team of Useability Experts are working around the clock to make the Hatchery even more intuitive and easy! So some of the information here, especially the screenshots may be out of date by the time you read this. Also, the documentation team is exceptionally lazy. Did we mention you can help update the documentation!? Go to the website project to create a Pull Request!

Better yet, check out the repo for The Hatchery itself and make improvements.

In case you are experiencing issues receiving 419 errors, clear cookies and try again.

Find an App

This will probably be the challenging part. We recommend you do this on a big computer, like a laptop. Something with a keyboard.

Go to mch20222.badge.team and sift through our fine offering of Hello World apps and super slow bitcoin miner malware.

Pick an App

If you go to the apps details page, you can download the app. But you don’t need to. Just remember the Category.

Now, go to the Hatchery app on the Badge.

Hatchery … the app

Next you’ll be asked whether you want to install an ESP32 app, a Python egg or and FPGA bitstream. At the moment you kindof need to guess, here’s a heuristic:

If the details page contains:

  • a file named main.bin it’s ESP32
  • a bunch of Python files, it may be Python
  • a file named bitstream.bin it’s an FPGA bitstream

In the next step, go to the Category remembered. Let’s pick “Safe Credit Card Detail Storage” (ESP->Utility). That sounds totally legit! Select it with the A button and you will see app details. As you can see, the app is, in fact, totally legit.

Totally legit

Now just press A to install. It will download for a while. Once it’s done, go to the “Apps” menu and your brand new app should be available to launch! Or … uninstall.

App Launcher

3 - Using Your Badge

Your MCH badge comes with installed software which allows you to select and run applications, install new applications from the online Hatchery, and configure Badge functions such as the Wi-Fi SSID and password (don’t worry, it can connect to camp Wifi out of the box).

This page is a high-level introduction to the installed software. If you came here looking for details on how to write software for the badge, then take a look at our software development guide.

Start at the menu screen

When you first turn on your badge, you’ll see a series of logos of the MCH2022 sponsors (Thanks again!) before finally a chime plays on the speaker and you find yourself at the main menu screen. It’s a graphical launcher with a series of icons for the different Badge functions. You can select a function with the joystick before launching it with the A button or by clicking the joystick.

When you are in an app the convention is that the A button is usually an action, the B button should take you one step back, and the Home button at the bottom left of the screen should take you out of the app and back to the menu.

As shipped, the badge has seven options on the main menu:

  • Name Tag. This is the usual name tag app for an event Badge.
  • Apps. This takes you to the user-installed apps on The Badge, including a Python launcher for backwards compatibility with previous Badge.team badges going back to the SHA 2017 badge.
  • Hatchery. This is the app store for The Badge. Explore it to find new apps written by other MCH attendees.
  • Tools. Here you can find a file browser, as well as infra-red remote control apps for some of the camp lighting.
  • Settings. This takes you to a selection of badge configuration options. The badge ships pre-configured for the MCH2022 network, however it’s on this menu that you can find the tool to reconfigure it for your home network.
  • App update. This option updates the apps on your badge to their latest versions from the hatchery.
  • OS update. Here you can update the badge firmware.